Game words (each defined once)
| Word | Meaning |
|---|---|
| POLLEN | Small yellow ball, 7.1 cm. There are 40 in a match manual 9.8. |
| NECTAR | Large ball in alliance colour, 9.1 cm. Each alliance has 8 manual 9.8. |
| HIVE | Our alliance's rocking structure at the centre of the field. It has 2 CELLS, and one of them always faces up manual 9.6. |
| CELL | The box we launch into. Only the upward CELL counts manual 10.5.1. |
| TIP | The HIVE rocks over once about 195 g of balls is in the upward CELL [MEASURED]. The other CELL then faces up manual 10.5.1. |
| FLOWER | One of the 4 vertical tubes on the perimeter wall. Balls go in at the top, and POLLEN can be taken out at the bottom manual 9.7. |
| GARDEN | A 23 x 2 in strip in a corner. Each ball in our GARDEN scores 1 point at the end manual 9.3, 10.5.3. |
| LOADING ZONE (LZ) | A 23 x 11 in box against the wall next to our ALLIANCE AREA. We PARK here, and the human player puts our NECTAR in here manual 9.3, G427. |
| ALLIANCE AREA | Where the drive team stands. 5 of our NECTAR wait here at the start manual 10.3.1. |
| LEAVE / PARK | LEAVE: at the end of AUTO the robot no longer touches the perimeter wall. PARK: the robot is at least partly in the LZ, scored at the end of AUTO and again at the end of the match manual 10.5.4. |
| AUTO / TELEOP | AUTO is the first 30 s, when the robot drives itself. Then come 8 s of transition with no motion, then 2:00 of TELEOP, when drivers control the robot manual 10.4. |
| CONTROL | The robot holds or herds a ball. The limit is 4 manual glossary, G407. |
| RP | Ranking points manual 10.5. |
(a) How the game scores
| What | AUTO | TELEOP | Notes |
|---|---|---|---|
| LEAVE | 3 per robot | - | Off the wall at 0:30 manual Table 10-2 |
| PARK in the LZ | 5 per robot | 5 per robot | Partly in the LZ manual |
| HIVE TIP | 20 | 20 | Shared by the alliance. A TIP finished before TELEOP starts counts as AUTO manual 10.5 B |
| Ball left in the upward CELL at the end | - | 2 each | manual |
| Ball in a FLOWER we own | - | 2 each | We own it if our NECTAR is the top-most NECTAR in the scoring volume, no matter who put the other balls in manual 10.5.2 |
| Bottom NECTAR bonus | - | 5 | For the alliance whose NECTAR is the bottom-most NECTAR in a FLOWER. The overview says alliances score "by placing their ALLIANCE'S NECTAR in each FLOWER before their opponent" manual 8. We read this as 5 per FLOWER, first NECTAR in wins it. Confirm this in Q&A. |
| Ball in our GARDEN | - | 1 each | Counts for us no matter who placed it manual 10.5.3 |
| MINOR / MAJOR FOUL | Gives the opponent 5 / 20 points manual Table 10-4 |
Sizes to remember: 1 TIP = 20 points = 10 balls in an owned FLOWER = 4 PARKs.
Ranking points manual Table 10-3, "All Other Events"; Regionals and Worlds are TBA:
| RP | Threshold | What it means for us |
|---|---|---|
| WIN | more points | 3 RP (TIE 1) |
| SWARM | LEAVE + PARK points (AUTO and TELEOP together) at least 16 | Both robots LEAVE (6) and both PARK at the end (10) = 16 exactly. Two AUTO PARKs (10) plus 2 LEAVEs (6) also make 16. We cannot reach it alone: one robot can earn at most 13. |
| POLLINATOR 1 | 4 TIPS in the match | Realistic for us with an average partner |
| POLLINATOR 2 | 7 TIPS | Out of reach for us now: 0 % in the model (at most 7 % even with a strong partner) |
Match flow manual 10.1, Table 9-1, G410, G426: - 2:30 AUTO starts. - 2:00 TELEOP starts after the 8 s transition. - 1:00 "Chime": FLOWER scoring unlocks, and the human may enter all remaining NECTAR. - 0:20 "Train Whistle": "Final 20 seconds". This is only an audio cue. There is no special rule for the last 20 s. - 0:00 end.
NECTAR entry, exact text: "for each time the HIVE of their corresponding ALLIANCE color is TIPPED, one additional NECTAR may be entered ... when 60 seconds or less remain in the MATCH, all remaining NECTAR can be entered" manual G426. It enters only through our LZ, by hand, with no tool, and must touch the LZ tiles first manual G427. The CELL also starts with 3 of our NECTAR already in it manual 10.3.1.
HIVE TIP: what it takes [MEASURED, Mark 2026-11-17]. - The HIVE tips by weight: about 195 g in the upward CELL. - POLLEN = 25 g, NECTAR = 40 g, so 1 NECTAR = 1.6 POLLEN. - Every combination Mark saw tip is the smallest count that reaches 195 g:
| Combination | Weight | Tips? |
|---|---|---|
| 8 POLLEN | 200 g | yes |
| 1 NECTAR + 7 POLLEN | 215 g | yes |
| 1 NECTAR + 6 POLLEN | 190 g | borderline (may or may not tip) |
| 2 NECTAR + 5 POLLEN | 205 g | yes |
| 3 NECTAR + 3 POLLEN | 195 g | yes (the smallest seen) |
| 4 NECTAR + 2 POLLEN | 210 g | yes |
| 5 NECTAR | 200 g | yes |
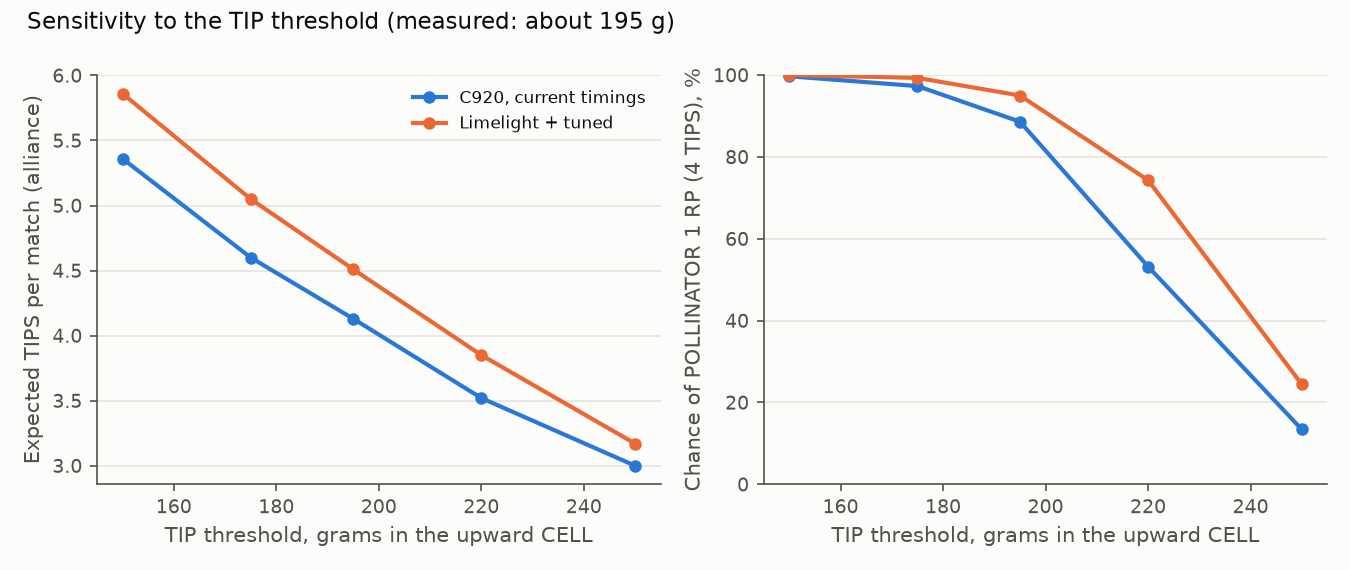
How the model handles this: 195 g always tips. 190-194 g tips 40 % of the time assumption for "borderline". Plays aim for at least 195 g plus one spare ball.
At the start, the upward CELL already holds 3 of our NECTAR = 120 g manual 10.3.1. So the first TIP needs only 3 POLLEN (75 g). The 4th pre-load is the spare.
The downward CELL starts empty: the manual stages NECTAR only "in each upward-facing CELL" manual 10.3.1. So every TIP after the first starts from an empty CELL and needs about 195 g. One load of 4 balls is at most 4 NECTAR = 160 g, so a TIP from an empty CELL always takes at least two loads (ours plus the partner's, or two of ours).
What the manual does NOT tell us: - Where a TIP's balls go. They fall out of the CELL that swings down. The model drops them on the floor under that CELL and lets us reach 70 % of them assumption. Balls that roll onto the blue side are off limits in AUTO manual G402. Never catch them in the air manual G409. - Any "launch zone". We searched all of TU07: there is no launch-zone rule this season. Shoot from wherever the shot works.
(b) Model results and the 5 biggest levers
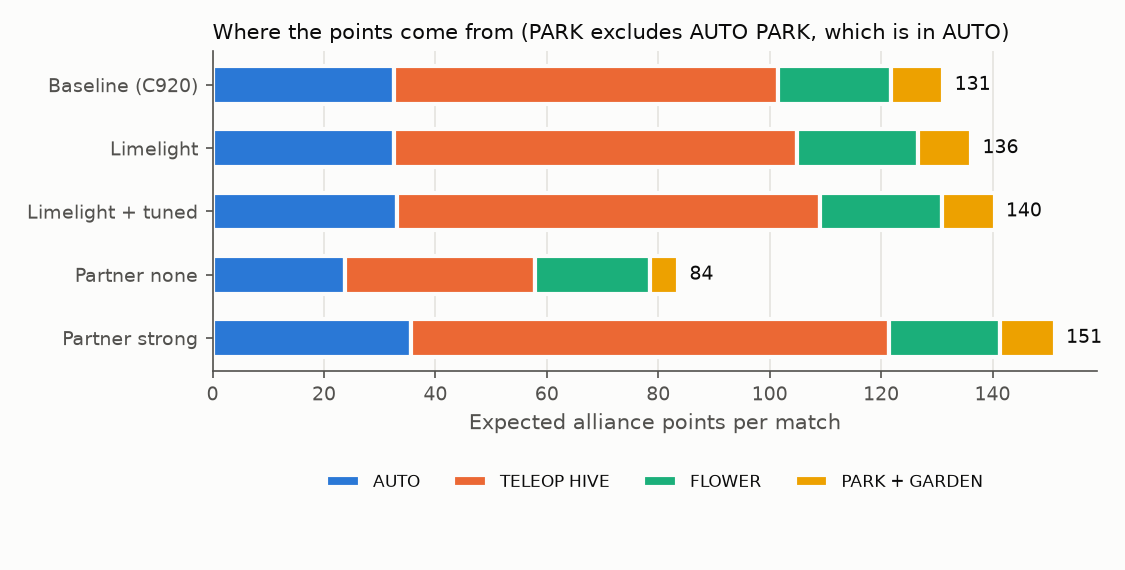
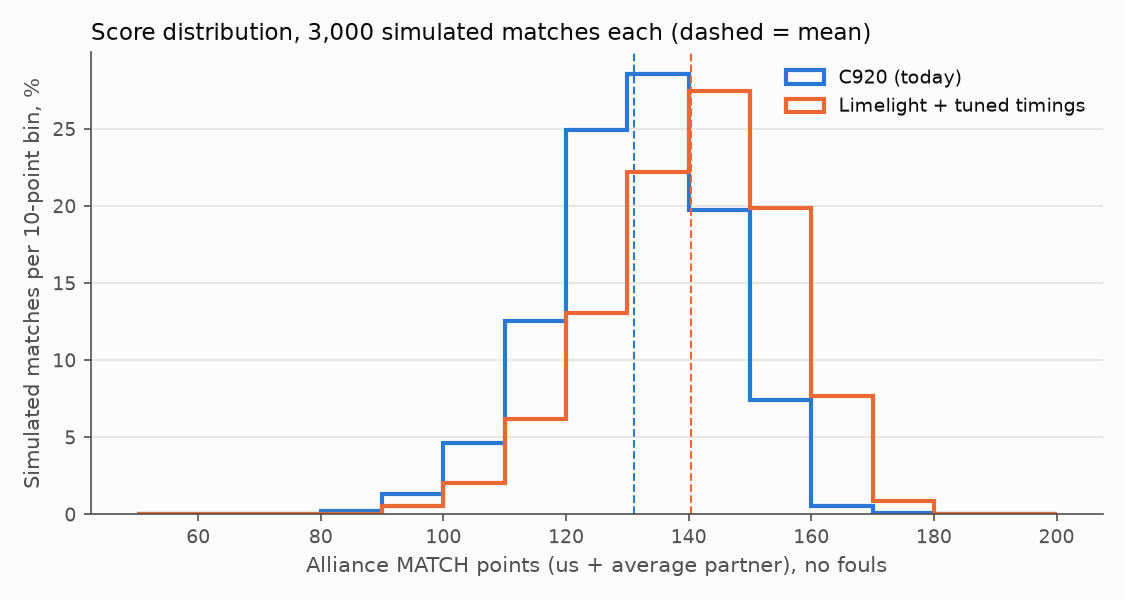
Baseline model: our V7 with the C920, AUTO A2, FLOWER trips from 1:00, an "average" partner, TIP at 195 g (MEASURED), 3,000 simulated matches. The timings are still assumptions (2.5 s per ball pickup, 2.0 s between shots, 1.5 s to aim).
| Result | Baseline (C920) | Limelight | Limelight + faster load/shoot |
|---|---|---|---|
| Expected alliance points (no fouls) | 131 (10-90 % range 113-148) | 136 | 140 |
| from AUTO / TELEOP HIVE / FLOWER / end PARK | 33 / 69 / 20 / 10 | 33 / 72 / 22 / 10 | 33 / 76 / 22 / 10 |
| TIPS per match (alliance) | 4.1 (0.95 in AUTO) | 4.3 | 4.5 |
| Chance of 2 TIPS in AUTO | 0 % | 0 % | 3 % |
| Chance of POLLINATOR 1 (4 TIPS) | 89 % | 93 % | 95 % |
| Chance of POLLINATOR 2 (7 TIPS) | 0 % | 0 % | 0 % |
| Chance of SWARM | 95 % | 95 % | 95 % |
Charts: - chart_points_by_period.png - chart_score_distribution.png - chart_levers.png - chart_tip_threshold.png - chart_auto_two_tips.png
Sanity checks. - The first TIP in AUTO happens in 95 % of matches. It fails only when our AUTO fails (assumed 15 %) and the partner's preloads miss. - With no partner, SWARM is 0 %: one robot can earn at most 13 of the 16 points. - No robot ever holds more than 4 balls; the code checks this. - No scenario ever reaches 3 TIPS in AUTO.
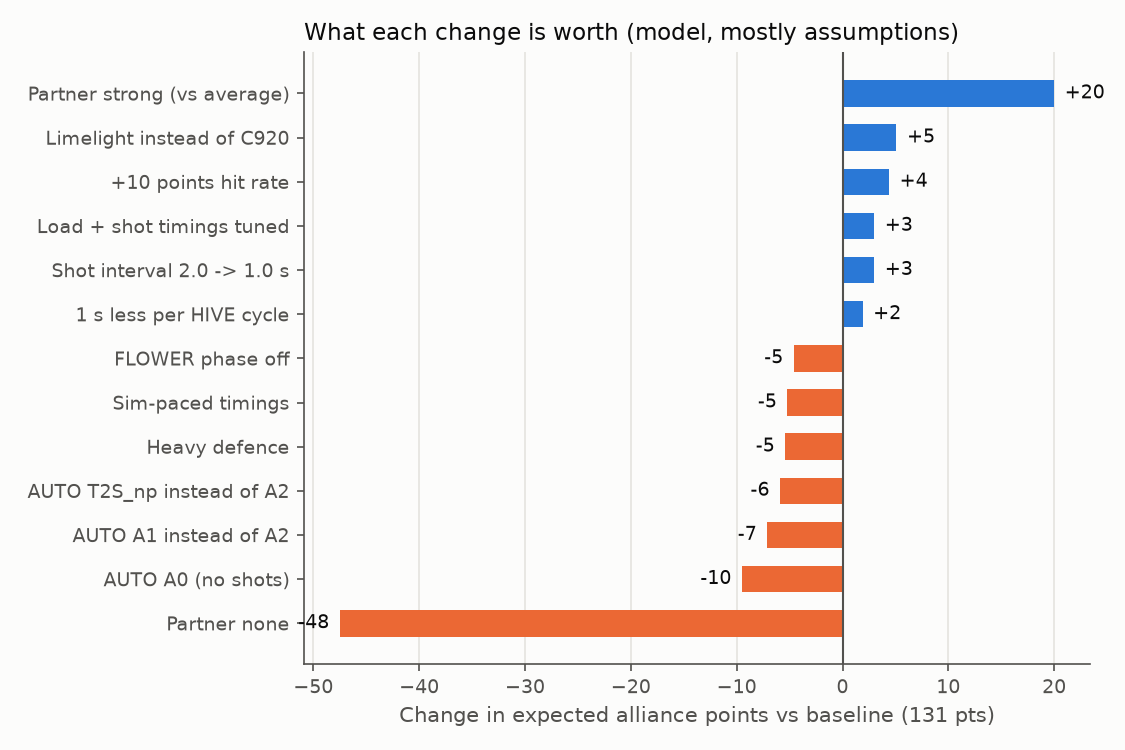
The 5 biggest levers (change in expected alliance points against 131)
- The partner. Strong +20, weak -19, none -48. With no partner, SWARM drops to 0 % and POLLINATOR 1 to 0 %. Scouting and the pre-match checklist in (f) are still worth more than any change to our robot.
- The AUTO choice. - A2 against A0 (no shots): +9.5. A2 against A1 (preload only): +7. - With a strong partner, A6 (the solo two-TIP play) scores 157 against A2's 151 (+6). - AUTO that never fails: +2.3.
- When the FLOWER phase starts. - FLOWER trips are worth +4.6 over HIVE-only play. - Starting them at 0:40 instead of 1:00 adds +1.3 and lifts POLLINATOR 1 from 89 % to 98 %.
- Limelight 3A instead of the C920: +5.1 points assumption: it aims 0.7 s faster and gets us closer to the sweet spot.
- Hit rate +10 points: +4.4.
Smaller levers: - Load and shot timings tuned (2.0 s pickup, 1.2 s between shots): +3.0. The same +3.0 comes from the shot interval alone (2.0 → 1.0 s). - 1 s less per cycle: +1.9. - Heavy defence: -5.4. - Sim-paced timings: -5.2.
The TIP threshold is now measured. The sensitivity is kept for reference: 175 g would be +8 points, 220 g -10.5 (chart_tip_threshold.png). The 190 g borderline changes the totals very little.
(c) AUTO library (RED; mirror for BLUE)
Rules for every AUTO. - Start manual G304: - touching the wall - fully on our side (red = columns A-C) - not in the LZ - not touching a FLOWER - touching exactly 4 pre-load POLLEN - Stay on our side for all of AUTO manual G402. Taking balls or contacting robots on their side is a MAJOR FOUL. The red rear FLOWER and the red wall FLOWER are on our side; the other two are not [figure]. - Never control more than 4 balls manual G407. Never catch balls falling from a TIP manual G409. - Taking POLLEN out of a FLOWER in AUTO is allowed. G418 says only "only remove POLLEN from the bottom of a FLOWER" and sets no time limit. The 1:00 limit (G410) is only for putting NECTAR in. Taking POLLEN out of a FLOWER we may own later costs 2 points per ball then. - At the start, red's upward CELL is the audience-side one (tags 34-37). The rear CELL (tags 30-33) comes up after TIP 1 manual 10.3.1, Fig 10-2.
Two-TIP plays (Mark's goal: 2+ TIPS in AUTO)
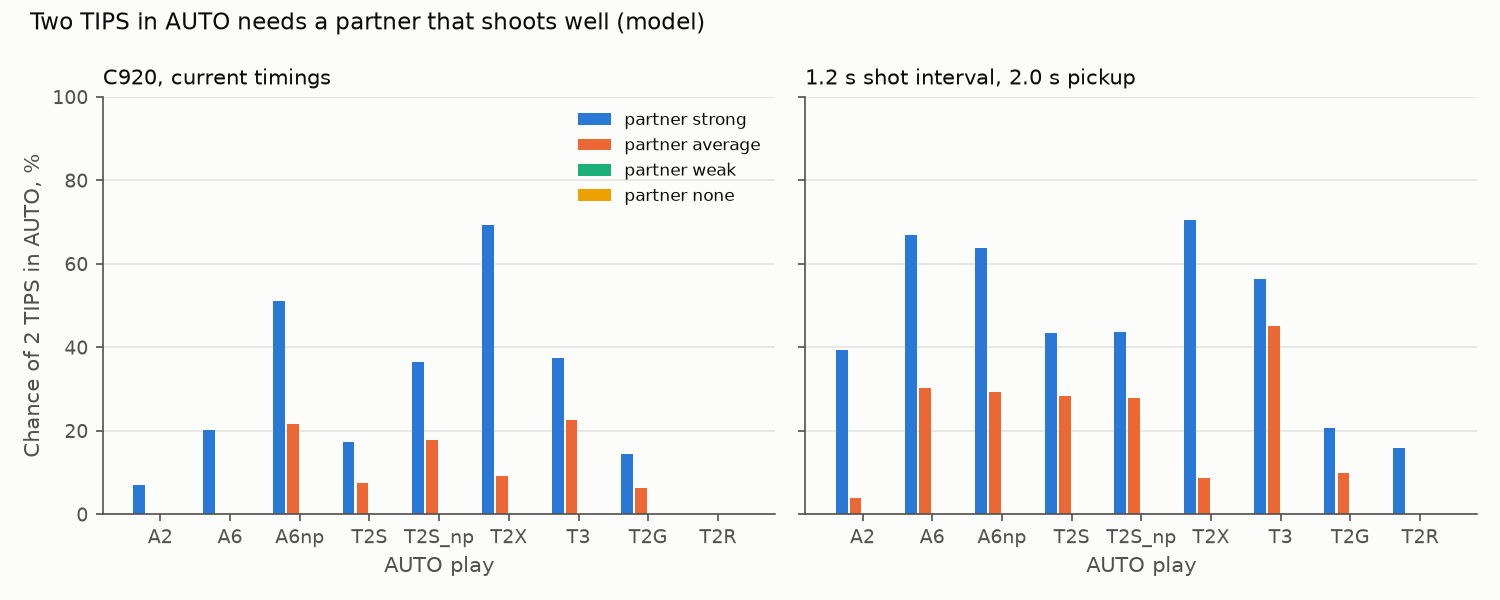
All numbers are model. - Current = C920, 2.5 s per pickup, 2.0 s between shots. - Tuned = 2.0 s per pickup, 1.2 s between shots (C920). - AUTO pts and match pts are for the alliance with an average partner unless marked.
| ID | Our role (we start at the audience wall) | Partner's role | P(2 TIPS in AUTO): avg / strong / no partner, current | same, tuned | AUTO pts (avg) | Match pts avg / strong | SWARM (avg) |
|---|---|---|---|---|---|---|---|
| A6 (recommended once the wedge works) | 1) Fire preloads at the audience CELL until it TIPS (3 needed, 4th is the spare, held if not used). 2) Collect the spill under the audience CELL after it lands (expect 2 NECTAR + 1 POLLEN). 3) Fire at the rear CELL (about 130 g). 4) Wedge 4 POLLEN from the red rear FLOWER, right next to the rear spot (3 needed for 205 g, 4th is the spare: 230 g). 5) Fire → TIP 2. 6) PARK off the wall | Its own AUTO. Best: fire its preloads at whichever CELL is up, then PARK | 0 % / 20 % / 0 % | 30 % / 67 % / 0 % | 32.5 (tuned 38.6) | 131 / 157 | 95 % |
| A6np | A6 without the AUTO PARK (more time to shoot) | as A6 | 22 % / 51 % / 0 % | 29 % / 64 % / 0 % | 32.2 | 126 / 154 | 83 % |
| T2X | Fire preloads → TIP 1, collect 3 GARDEN POLLEN, fire at the rear CELL (no PARK) | Start at the rear wall; wait for the rear CELL; fire 4 preloads; collect the audience-side spill; fire again (no PARK) | 9 % / 69 % / 0 % | 9 % / 71 % / 0 % | 23.5 | 126 / 147 | 64 % |
| T3 (aims for 3) | As T2S, then collect the rear spill and fire back at the audience CELL | As T2X | 23 % / 38 % / 0 % | 45 % / 56 % / 0 % | 26.4 | 122 / 139 | 65 % |
| T2S | Fire preloads → TIP 1, collect the spill, fire at the rear CELL, PARK | Rear start; wait for the rear CELL; fire 4 preloads; PARK | 7 % / 17 % / 0 % | 28 % / 43 % / 0 % | 29.7 | 129 / 146 | 95 % |
| T2S_np | T2S without our PARK | as T2S | 18 % / 36 % / 0 % | 28 % / 44 % / 0 % | 29.4 | 125 / 144 | 83 % |
| T2G | As T2S but the GARDEN instead of the spill | as T2S | 6 % / 14 % / 0 % | 10 % / 21 % / 0 % | 29.5 | 129 / 147 | 95 % |
| T2R (roles swapped) | Start at the rear wall; wait for the rear CELL; fire 4; collect the spill; fire; PARK | Fires preloads at the audience CELL for TIP 1 | 0 % / 0 % / 0 % | 0 % / 16 % / 0 % | 26.4 | 128 / 146 | 95 % |
What this says. - 2 TIPS in AUTO needs a partner that shoots well, or much faster timings than we assume today. - With an average partner, the best chances are 22-30 % (A6np today, A6 tuned). - With a strong partner: 67 % (A6 tuned) or 69 % (T2X). - The best play is A6, judged by total points. It matches A2 with an average partner (131), beats it with a strong one (157 against 151), and keeps the AUTO PARK and SWARM. The trade-off: it needs the wedge (not built, not simulated). - Plays that drop the AUTO PARK raise the 2-TIP chance a little but cost SWARM (64-83 % against 95 %). The 2 extra TIP points rarely make up for it. - 3 TIPS in AUTO: 0 % in every case, including the fastest timings. TIP 3 would need another 195 g in the audience CELL in the last few seconds. - If the partner has no AUTO: no play reaches 2 TIPS at current or tuned timings. Run A2 or A6 for 1 TIP plus LEAVE plus AUTO PARK (about 24 alliance AUTO points). The solo budget below shows what it would take.
Solo two-TIP AUTO (A6, no partner help): timing budget
Worst case: TIP 2 needs 8 POLLEN (200 g). With the spilled NECTAR it needs 1 POLLEN + 2 NECTAR + 1 POLLEN (130 g), then 3 more POLLEN (75 g): 205 g. The 4th wedge ball is a spare (230 g). - Spilled NECTAR does not save a load: the best single load is 3 NECTAR + 1 POLLEN = 145 g, still short of 195 g. Two loads are always needed after TIP 1. - What the NECTAR does buy is the spare ball. The all-POLLEN route (1 + 3 GARDEN + 4 wedge = 8 POLLEN = 200 g) needs every one of the 8 shots to go in.
Distances come from the manual figures (±0.15 m) [figure]. Times are deterministic with every shot in (from results.json, solo_2tip_budget).
| Step | Distance | Current assumed | Tuned | Must take (fits 30 s) |
|---|---|---|---|---|
| 1 Drive start → audience shooting spot | 0.27 m | 0.8 s | 0.8 | 0.5 |
| 2 Aim on tags 34-37 | 1.5 | 0.8 | 0.6 | |
| 3 Fire 3 POLLEN → TIP 1 (195 g); hold the 4th | 4.8 | 3.2 | 2.0 | |
| 4 Drive to the spill and wait for it to land (G409) | 0.67 m | 2.0 | 2.0 | 1.5 |
| 5 Collect 3 (2 NECTAR + 1 POLLEN expected) | 7.5 | 6.0 | 4.5 | |
| 6 Drive round the HIVE to the rear spot | 2.3 m | 2.8 | 2.8 | 1.8 |
| 7 Aim on tags 30-33 | 1.5 | 0.8 | 0.6 | |
| 8 Fire 4 (130 g in the rear CELL) | 6.8 | 4.4 | 2.7 | |
| 9 Drive to the red rear FLOWER, wedge down | 0.25 m | 0.8 | 0.8 | 0.5 |
| 10 Wedge 4 POLLEN (3 needed, 1 spare) | 10.0 | 8.0 | 6.0 | |
| 11 Back to the rear spot | 0.25 m | 0.8 | 0.8 | 0.5 |
| 12 Aim | 1.5 | 0.8 | 0.6 | |
| 13 Fire 4 → TIP 2 | 6.8 | 4.4 | 2.7 | |
| 14 Drive to the LZ, stop off the wall (AUTO PARK) | 0.75 m | 1.3 | 1.3 | 0.8 |
| Total | 4.5 m | 48.7 s | 36.7 s | 25.3 s |
Required numbers (the "must take" column): - Shot interval 0.7 s (today 2.0 assumed, 2.9 in the sim). First shot 0.6 s. - Collection 1.5 s per ball, for both the spill and the wedge (today 2.5 assumed, 3.8 sim-paced). - Aim 0.6 s. - Drive 1.5 m/s average with 0.3 s per leg (today 1.0 m/s assumed). - Per cycle (collect 4 + drive + aim + fire 4): about 11 s, against about 21 s today.
Probability of solo 2 TIPS in AUTO model, no partner, AUTO always runs: - Current timings: 0 %. - Tuned (Limelight, 2.0 s pickup, 1.2 s shots): 0 %. - At the "must take" timings: 48 %. The losses come from misses (about 90 % per shot assumed), wedge failures (80 % per try assumed) and fewer NECTAR reachable in the spill. The GARDEN version (A6G) reaches only 17 % at the same timings.
Is it realistic? Not today. - A solo 2-TIP AUTO needs every step about twice as fast as we assume now. - The shot interval would need to fall to about a third of the sim's. - Treat it as a stretch goal. Go after it only if Sunday's measured times come close to the "must take" column.
The 3 biggest time sinks (current assumed timings): 1. Time between shots: 8 intervals = 16 s. This is the windmill index plus the settle wait (60 deg/s and a 0.4 s wait in the sim). It is a code and servo-speed question. 2. Picking up 7 balls: 17.5 s, 10 s of it at the wedge. The wedge is not built or simulated. 3. Three aims: 4.5 s. The camera and the AprilTag pipeline. The Limelight should help.
Add-on (4) from Mark: "collect 4 more on the way to PARK and carry them into TELEOP". This only fits if the run beats 30 s by about 6 s. It is legal: holding 4 balls at 0:30 is fine, and robots don't move in the transition manual G403.
What to measure on Sunday to know (see (h)): - Shot interval over 4 balls. - Wedge seconds per ball and successes per try. - Seconds per ball picking up a scattered spill. - Aim time from arrival to the first shot. - Average drive speed over the 2.3 m around the HIVE. - Where the spilled balls actually land: count how many end up on the red side, reachable, and within 1 m of the CELL.
Other AUTO routines
| ID | Start | Steps | AUTO pts | Match pts | Pick it when |
|---|---|---|---|---|---|
| A2 (default today) | Audience wall | Fire 4 → TIP 1; collect the 4 GARDEN POLLEN; fire at the CELL that is now up; PARK off the wall | 32.6 | 131 | Until the wedge works. Same total as A6 with an average partner |
| A3 | Alliance wall | Fire 4, wedge 4 from the red wall FLOWER, fire, PARK | 32.4 | 129 | The partner uses our GARDEN |
| A4 | Rear wall (not in the LZ) | Fire at the up CELL, wedge 4 from the red rear FLOWER, fire, PARK | 32.1 | 128 | The partner takes the audience start |
| A1 | Audience wall | Fire 4, PARK | 31.8 | 124 | The GARDEN pickup is not reliable yet |
| A0 | anywhere | Off the wall, PARK | 26.5 | 122 | Robot can't shoot. Still 8 points and SWARM |
AUTO notes. - LEAVE and AUTO PARK together: finish in the LZ but not touching the perimeter wall manual 10.5.4. Stop about 5 cm short of the wall. - Fire until the TIP, then hold. After the 3rd POLLEN the audience CELL holds 195 g and should tip. Stop firing while it swings manual 10.5.1 note. Keep the 4th ball for the rear CELL. - Check the tags before every volley. Tags 34-37 = the audience CELL is up; 30-33 = the rear CELL is up. Never fire at the down CELL manual G417. - The partner's best AUTO role in every two-TIP play: start at the rear wall, wait until the camera sees tags 30-33 (the rear CELL is up), fire 4 preloads, PARK.
(d) TELEOP cycle loop and decision rules
The loop. - COLLECT up to 4. - Sources, in order of cost: balls on the floor near the HIVE (spilled by TIPs or misses), our NECTAR in the LZ, the GARDEN line, and POLLEN from a FLOWER bottom using the wedge. - Never take POLLEN out of a FLOWER we plan to own or already own. - DRIVE to the shooting spot of the upward CELL. - AIM on that CELL's tags. - FIRE the 4 balls. - Go back to COLLECT.
Which CELL is up, and how the camera knows. - Each CELL has a cluster of 4 AprilTags on its underside, facing the floor manual 9.6, 9.9. - Red: rear CELL = IDs 30-33, audience CELL = 34-37. Blue: audience = 38-41, rear = 42-45. - The tag cluster under the upward CELL faces down toward the tiles, so it is the one the C920 (about 30 deg up) sees from the shooting spot. A down CELL's underside is turned away. - Rule: only fire when tags of our colour are seen and they belong to the CELL in front of us. If we see the other CELL's IDs, the HIVE has tipped: drive to the other spot.
Shooting spot. About 1.3 m horizontally from the release point to the CELL opening centre. The sweet spot is only about 0.2 m deep at 80 % hits sim, sim_study/hive_cal/README.md. A slightly diagonal approach (up to 45 deg) is fine. The rear-side spot is near the rear wall, so mark both spots with tape on Sunday.
Flywheel speeds at 1.3 m sim: POLLEN 3,100 rpm, NECTAR 2,865 rpm. The real robot may need about 14 % less, so calibrate (programmer_handover.md 5).
Decision rules. 1. Never more than 4 balls. G407: "A ROBOT may not simultaneously CONTROL more than 4 SCORING ELEMENTS." The penalty is a VERBAL WARNING, or a MAJOR FOUL and YELLOW CARD if STRATEGIC. Repeated 5-ball control is "likely to be perceived as STRATEGIC, even if the ROBOT has a 'keep 4 and discard the rest' sorting mechanism". Ways to stay safe: - The intake stops at count 4 and stays off (programmer_handover.md 3). - A ball resting on top of the robot counts too. - If a 5th ball is pulled in, reverse it out at once. A momentary 5 that we reverse is "likely to not be perceived as STRATEGIC". 2. Pause when the HIVE is tipping. Shots during the swing can stop the TIP manual 10.5.1 note. Then re-aim at the new up CELL. 3. NECTAR entry. - After each of our TIPs the human player puts one NECTAR in the LZ, rolled so it touches the LZ tiles first manual G426, G427. - Before 1:00, a NECTAR weighs 40 g against a POLLEN's 25 g [MEASURED], so it speeds up a TIP. Use it. - Count the weight. An empty CELL needs 195 g. The cheapest TIPS are 3 NECTAR + 3 POLLEN, or 4 NECTAR + 2 POLLEN. - At 1:00 the human enters all remaining NECTAR at once. These are for the FLOWER trips. - Never enter one early: each is a MINOR FOUL manual G426. 4. Contested HIVE. - Our partner shoots at the same CELL. Agree sides: one robot on the left of the spot, one on the right. - Opponents may defend but may not PIN us for more than 3 s manual G421. If pinned, stop pushing, back out on a diagonal and call it to the drive coach. - Don't push back into their CELL area. Shooting at the opponent's HIVE is G417 (STRATEGIC example D). 5. Do not catch balls falling from a TIP. Let them hit the floor first manual G409. Don't park under the HIVE waiting. 6. Opponent NECTAR: never pick it up manual G408. If the colour sensor sees opponent NECTAR, reverse the intake at once. 7. TIP count at 1:00. If we have 3 TIPS and the CELL is more than half full, finish the 4th TIP before switching to FLOWERS. POLLINATOR 1 is worth 1 RP; the whole FLOWER phase adds only about 5 alliance points over HIVE-only play (131 against 126.5) model.
(e) The last 60 s: FLOWER plan
What the D3 tube can do sim, flower_compare_2026-11-17/COMPARISON.md, D3_roll_check.md: - With the robot nested on the FLOWER pipe (within ±5 mm), it delivers NECTAR 100 % and POLLEN 97-100 % at about 4 m/s (about 2,000-2,250 rpm). - About 0.2 s of flight per ball. The real limit is the windmill index between balls. - Off the nest at ±10 mm, NECTAR drops to 78 %; at ±20 mm, to 29 %. Seat the nest every time. - The flywheel must drop from HIVE speed to FLOWER speed. The spin-down time is not simulated assumption: 1 s.
Load order = fire order. The windmill delivers balls in the order they were loaded. Shoot in order and stop after the first NECTAR. Keep any balls behind the NECTAR for the next trip.
When to start. - G410: no NECTAR into a FLOWER before 1:00. A breach is a MAJOR FOUL per NECTAR. - Starting at 0:40 beats 1:00 in the model: 132 against 131 points, and POLLINATOR 1 at 98 % against 89 %. A NECTAR placed later has less time to be covered by an opponent NECTAR. - At 0:25 there is time for only one trip (-5 points).
| Situation | Target | Why |
|---|---|---|
| Default | 1st: red rear FLOWER (top wall, column B, about 1 m from our LZ). 2nd: red wall FLOWER | Short drives, we usually get the bottom bonus, low steal risk, and it ends next to the LZ for the PARK |
| Opponent has filled a FLOWER with many balls (more than 4 visible) | Steal it: put our NECTAR on top | We then own all its balls, up to about 7: 2 x 7 = 14. No bottom bonus, and they can steal it back. Only do it late (after 0:25) and only if the drive back to the LZ fits. As a fixed plan it is -2 points model |
| A FLOWER has no NECTAR yet | Put our NECTAR in first | +5 bottom bonus, even if they cover it later. The bonus stays with the bottom NECTAR |
| We own a FLOWER and an opponent robot is heading for it | Do not block it | Blocking a robot that is scoring in a FLOWER counts as disrupting manual G425 lists it for humans. Go and score elsewhere |
| Fewer than 4 TIPS at 1:00 and the CELL is half full | Finish the TIP first | 1 RP (rule 7 above) |
What to carry. - Just the NECTAR (plus any POLLEN already loaded) is slightly better than collecting 2 extra POLLEN first: 132.5 against 131 points model. The FLOWER already has about 3 staged POLLEN in its scoring volume. - Carrying 3 POLLEN first costs time (-1.6 points). - After AUTO A6 the red rear FLOWER has fewer staged POLLEN, because the wedge took them. It is still the nearest target to the LZ. - Never pull POLLEN out of a FLOWER we are about to own. It lowers our own count.
PARK timing. - From the red rear FLOWER to the LZ is about 1 m, about 1.5 s assumption: 1 m/s average. - Leave the last FLOWER by 0:05 at the latest, or 0:08 if anything is in the way. - 0:20 (Train Whistle): if we are not already at a FLOWER next to the LZ, go and PARK now. One PARK = 5 points plus SWARM. That beats 2 FLOWER balls. - At 0:00 stop all motion. Any powered movement after the end is penalised manual G404.
(f) Alliance roles and pre-match partner checklist
Roles (default).
| Us (V7) | Partner | |
|---|---|---|
| AUTO | A6 (or A2 until the wedge works) from the audience wall: TIP 1 with 3 preloads, reload, fire at the rear CELL, AUTO PARK | Two-TIP role: start at the rear wall, wait for the rear CELL (tags 30-33), fire 4 preloads at it, AUTO PARK. At the very least LEAVE + PARK |
| TELEOP to 0:40 | HIVE cycles, 4 balls each | HIVE cycles. Collect from the floor near the HIVE, not our LZ |
| 0:40 to end | FLOWER trips with our NECTAR (rear FLOWER, then wall FLOWER), PARK | HIVE until about 0:15, then PARK. Leave the late NECTAR in the LZ for us |
| Human player | Enter 1 NECTAR per TIP, then all at 1:00 |
Pre-match checklist (ask the partner, 2 minutes). 1. AUTO: do you have one? From which wall? Does it shoot, and at which CELL? Can it wait for the rear CELL to come up and fire its preloads there (that is what makes 2 AUTO TIPS possible)? Does it end in our LZ (and off the wall)? 2. How many balls per volley, and roughly how many per minute? What hit rate in practice? 3. Can you PARK in the LZ at the end? (SWARM needs both robots: 2 LEAVE + 2 PARK = 16.) 4. Do you play FLOWERS? If yes, which FLOWER and from when? (Avoid us both going for the same FLOWER.) 5. Who is the human player, and do they know: one NECTAR per TIP, all at 1:00, into the LZ only? 6. Agree the shooting side at the HIVE spot (left or right) so we don't bump. 7. Defence plan: if an opponent robot is much faster, does one of us defend? (Default: no. We both score.) 8. Any known faults: brown-outs, a robot that tips over, or 5-ball pickups (a G407 risk for the alliance in playoffs, where cards apply to the whole alliance manual 10.6.3).
(g) Penalty guardrails (the "don'ts")
Costs: MINOR FOUL = 5 points to the opponent, MAJOR FOUL = 20 manual Table 10-4. YELLOW CARDS add up: a second one becomes a RED CARD, and a RED CARD means 0 points for that match manual 10.6.1.
| Don't | Rule | Cost |
|---|---|---|
| Control more than 4 balls | G407 | Warning; MAJOR (20) + YELLOW if STRATEGIC |
| Put NECTAR in a FLOWER before 1:00 | G410 | MAJOR (20) per NECTAR |
| Enter NECTAR early or outside the LZ (human) | G426, G427 | MINOR (5) per NECTAR |
| Push a ball into a FLOWER from the side, or take NECTAR out of a FLOWER | G418 | Warning; MAJOR + YELLOW if STRATEGIC. Only in at the top, only POLLEN out at the bottom |
| Grab, hook onto or shake a FLOWER (the nest may wrap partly around it: allowed) | G415 | Warning; YELLOW if STRATEGIC |
| Hit or ram the HIVE, or launch at the outside of a CELL or at their HIVE | G417 | Warning; MAJOR + YELLOW if STRATEGIC |
| Catch balls falling from a TIP | G409 | Warning; YELLOW if STRATEGIC |
| Pick up opponent NECTAR | G408 | Warning; YELLOW if STRATEGIC |
| Pin an opponent for more than 3 s | G421 | MAJOR + another MAJOR every 3 s |
| Cross to their side in AUTO / contact them there | G402 | MAJOR per match |
| Move between AUTO and TELEOP, or after 0:00 | G403, G404 | Warning; MAJOR + YELLOW if STRATEGIC |
| Hoard balls / block their access | G411 | MAJOR + YELLOW |
| Shoot balls out of the field on purpose | G405 | MAJOR per ball |
| Grow past 18 x 24 x 29 in (FLOWER tube up) | G416 / R105 | Warning; MAJOR if STRATEGIC |
| Touch the robot or a ball on the tiles (drive team) | G425 | Warning; MAJOR + YELLOW if STRATEGIC |
(h) What to measure on Sunday (to replace assumptions)
Done [MEASURED, Mark 2026-11-17]: - TIP threshold about 195 g, with 190 g (1 NECTAR + 6 POLLEN) borderline. - POLLEN 25 g, NECTAR 40 g. - The tipping combinations in the table in (a).
Still to measure, in order of how much each one moves the model and the AUTO plan:
| # | Measure | Replaces | How |
|---|---|---|---|
| 1 | Shot interval inside a 4-ball volley (windmill index + settle + feed) | shot_interval_s (2.0; sim 2.9; solo two-TIP AUTO needs 0.7) |
Video or stopwatch from the 1st to the 4th ball leaving, 10 volleys |
| 2 | Hit rate at 1.3 m, 4-ball volleys, C920 aiming from a cold start | mech_hit x hive_pos_factor (0.95 x 0.88) |
10 volleys of POLLEN, 5 of NECTAR, 5 mixed. Count in/out |
| 3 | Pickup time per ball: from a scattered spill (8 balls dropped from 1.5 m onto the tiles), from the GARDEN line | load_s_per_ball_floor (2.5; solo AUTO needs 1.5), load_s_per_ball_garden (2.0) |
Stopwatch, 5 runs each |
| 4 | Wedge: extractions per try, seconds per ball | wedge_success (0.8), load_s_per_ball_wedge (2.5; solo AUTO needs 1.5) |
10 drives into a FLOWER base or mock (B16 bench check). A6 depends on it |
| 5 | Aim time from arrival to the first shot, C920 (later the Limelight) | aim_s (1.5; solo AUTO needs 0.6) |
10 arrivals from 2 m |
| 6 | Drive: average speed over 2.3 m around a HIVE leg; start to audience spot; rear spot to the LZ | speed_m_s (1.0; solo AUTO needs 1.5) |
Stopwatch, 5 runs |
| 7 | Where a TIP's balls land (only if a HIVE or mock is available): how many stay on the red side, within 1 m | spill_reachable_fraction (0.7) |
Tip it 5 times, mark where each ball stops |
| 8 | FLOWER trip: nest seat rate, flywheel retune time, s per ball | flower_nest_ok (0.85), flywheel_retune_s (1.0) |
10 trips with a NECTAR into a 4 in pipe at 21.5 in |
| 9 | AUTO A2 / A6 runs that finish as written (TIP, reload, second volley, PARK off the wall) | auto_success (0.85) |
10 runs, with the 30 s split time of each step |
Data sheet layout (one row per trial; copy into a spreadsheet):
Date | Trial # | Test (TIP/HIT/CYCLE/WEDGE/FLOWER/DRIVE/AUTO) | Camera (C920/LL) | Ball mix (P/N/mixed)
| Distance m | t_collect s | t_drive s | t_aim s | t_fire s | t_between_shots s | Balls fired | Balls in | Grams in CELL at TIP
| Wedge attempts | Wedge extractions | Nest seated (Y/N) | Ends in LZ off wall (Y/N) | Notes
After the session, put the averages into model_inputs.json, change their status to MEASURED with the date, and run python scoring_model.py.
(i) Driver cards
CARD 1: AUTO - Pre-match: - Ask the partner which AUTO they run (checklist in (f)). - Pick A6 if the wedge works and the partner shoots, otherwise A2. A0 if we can't shoot. - Start at the audience wall, column B/C, with 4 POLLEN. Not in the LZ, not touching a FLOWER. - OpMode selected, INIT pressed, robot still (G304, G305). Hands off from the countdown (G401). - What the robot should do (watch it, don't touch): 1. Fire at the audience CELL until it TIPS. 3 POLLEN + the 3 staged NECTAR = 195 g. Keep the 4th. 2. Wait for the spill to land, then pick up 3 (NECTAR first). For A2: the 4 GARDEN POLLEN. 3. Fire at the rear CELL (tags 30-33). 4. A6 only: wedge 4 POLLEN from the red rear FLOWER, fire again → TIP 2. 5. PARK in the LZ, about 5 cm off the wall (LEAVE + AUTO PARK). - Partner's job in a two-TIP play: start at the rear wall, wait for tags 30-33, fire 4 preloads, PARK. - At 0:30 put the controllers down. No motion in the 8 s transition (G403).
CARD 2: TELEOP HIVE (2:00 to 0:40) - Collect 4. The intake stops at 4. Never 5. If one sneaks in, reverse it out. - Drive to the spot of the up CELL. Check the tag IDs (red: 34-37 audience, 30-33 rear). Aim, fire 4. - If the HIVE TIPs mid-volley: stop, wait for it to settle, go to the other spot. - Leave opponent NECTAR alone. Don't catch falling balls. Don't pin for more than 3 s. - Human player: 1 NECTAR into the LZ after each of our TIPs.
CARD 3: 1:00 Chime - Human: put all remaining NECTAR into the LZ. - Count our TIPS. If 3 and the CELL is half full, finish the 4th TIP first. - Otherwise keep cycling the HIVE until 0:40.
CARD 4: FLOWER (0:40 to 0:10) - Pick up 1 NECTAR (behind any POLLEN already loaded). - Drive to the red rear FLOWER. Seat the nest. Switch the flywheel to FLOWER speed. - Fire in order and stop after the NECTAR. - Next: the red wall FLOWER, or steal a full opponent FLOWER only if it is late and close to the LZ.
CARD 5: 0:20 Train Whistle / end - If we are not next to the LZ, go and PARK now. - PARK partly in the LZ. - At 0:00 stop and put the controllers down (G404).
Not verified / limits of this playbook
- TIP threshold is MEASURED at about 195 g, with 190 g borderline (Mark 2026-11-17). The 40 % chance of tipping at 190-194 g is an assumption.
- Timings are not measured. Shot interval, pickup, wedge, aim and drive speed are all assumptions, and the two-TIP AUTO results depend on them almost entirely (see the budget in (c)).
- Where spilled balls land is not known. The manual does not say. The model puts them under the CELL that swung down and lets us reach 70 % assumption.
- Camera numbers are guesses (C920 vs Limelight aim time and hit factor). No camera test has been run.
- The FLOWER wedge and the D3 tube are not built. The wedge is not simulated. The D3 numbers come from a model of the tube, not the printed part, and the flywheel retune is not simulated.
- Field positions are read off manual figures (±0.15 m). The real shooting spots must be found on the robot.
- Opponents are not simulated as robots. They appear only as defence delays, spilled balls, and the chance they put NECTAR in a FLOWER first or steal it later. The model gives alliance points, not win probability.
- The generic partner is a profile, not a real team. "Strong" means 0.7 s between shots, 2.0 s pickup, 88 % hits.
- The bottom NECTAR bonus is read as per FLOWER, first NECTAR wins it. Ask in Q&A.